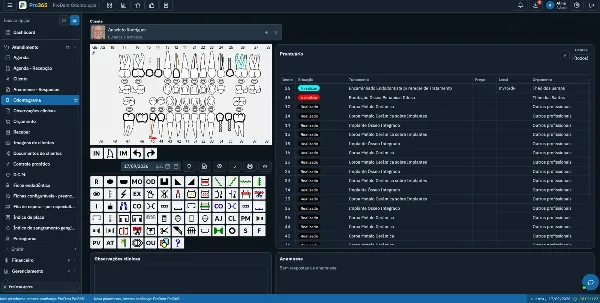
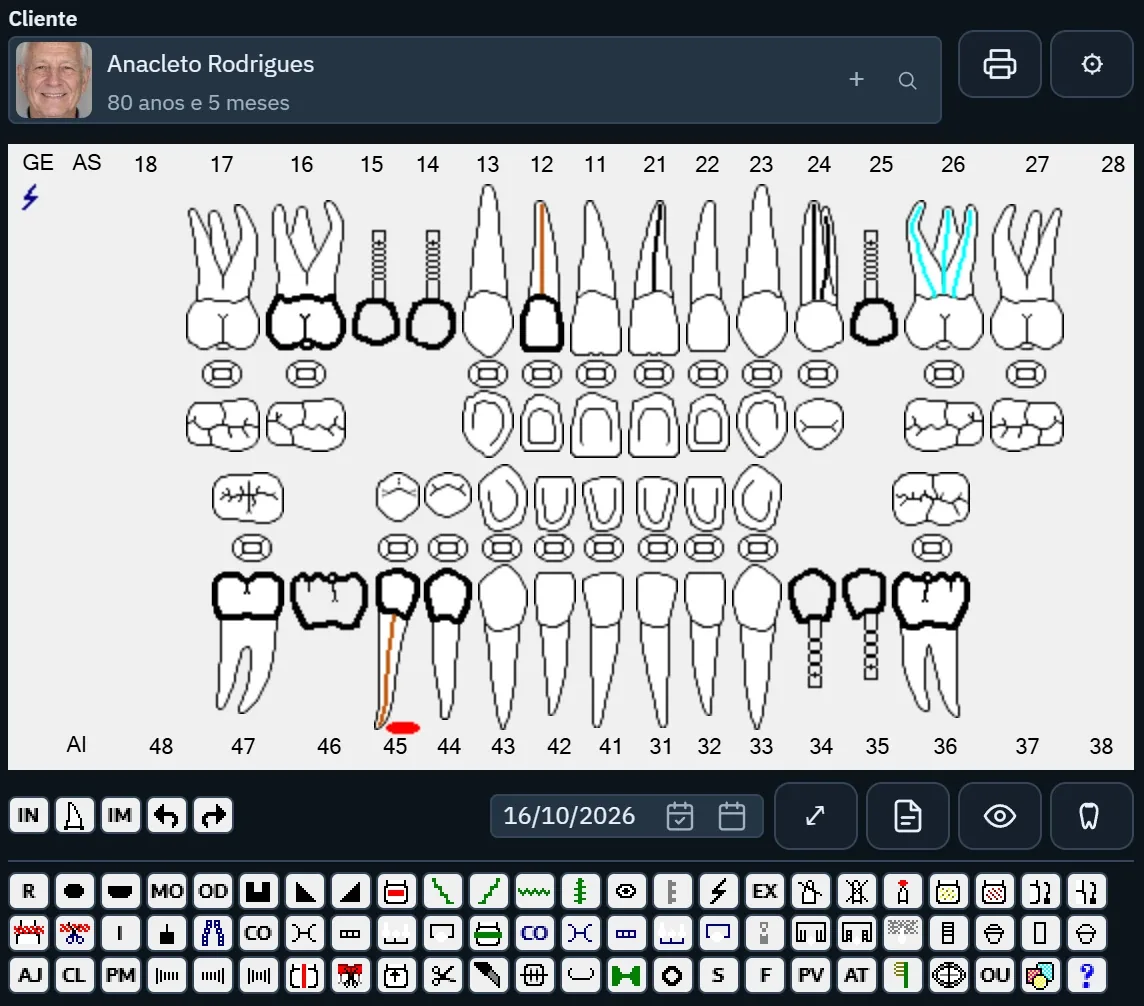
Digital dental charting is recording the patient's mouth on an odontogram inside your dental software: each tooth is numbered and shows its procedures as symbols, each marked as planned or done. The chart documents what you found at the exam, holds the treatment plan, feeds the treatment estimate and shows, at any visit, what has been completed and what is left.
What is a digital dental chart used for?
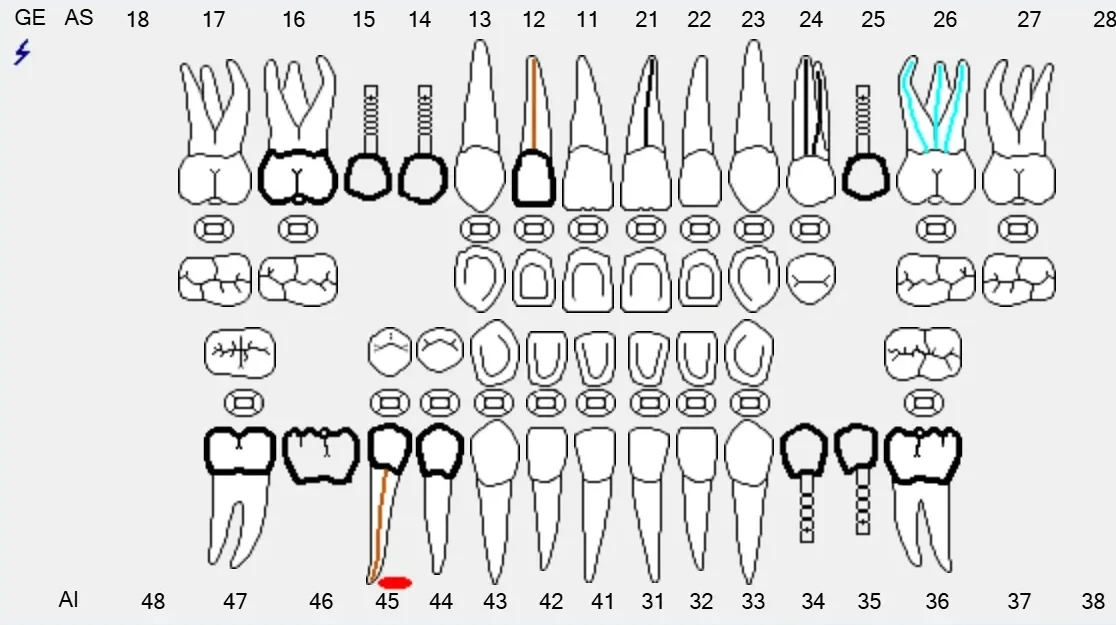
A dental chart, or odontogram, is a graphic record of the mouth: a drawing of both arches where the dentist notes, tooth by tooth and surface by surface, existing conditions and planned work. On paper, it's the tooth diagram filled in by hand. In a digital chart, the same drawing lives in the electronic dental record, and every mark is linked to the treatment plan, the estimate and the clinical notes.
Day to day, it does four jobs:
- Documents findings: decay, existing restorations, missing teeth, prostheses and implants are recorded with the exam date.
- Holds the treatment plan: each procedure is tied to the tooth and surface where it will be done.
- Feeds the estimate: what was charted becomes the line items the patient approves.
- Keeps continuity: whoever sees the patient next knows at a glance what is still outstanding.
That's why the chart sits at the center of the dental record, next to the medical history, images and signed forms.
What tooth numbering system do US dentists use?
Most US practices use the Universal Numbering System. The ADA says the universal tooth designation system is accepted and approved by the ADA and is the most commonly used by dental professionals in America, and it is the system used on the ADA Dental Claim Form.
- Permanent teeth: 1 to 32. Counting starts at the upper right third molar (#1), runs across the upper arch to the upper left third molar (#16), drops to the lower left third molar (#17) and ends at the lower right third molar (#32).
- Primary teeth: A to T. Lettering starts at the upper right second molar (A), runs to the upper left second molar (J), continues from the lower left second molar (K) and ends at the lower right second molar (T).
Right and left are always the patient's, which is why the patient's right side appears on the left of your screen.
Universal vs. FDI numbering: how do they compare?
Most of the rest of the world, including many dental labs, textbooks and patients who were treated abroad, uses the FDI two-digit notation, standardized as ISO 3950. The first digit is the quadrant (1 upper right, 2 upper left, 3 lower left, 4 lower right; 5 to 8 for primary teeth) and the second is the tooth's position from the midline, 1 for the central incisor to 8 for the third molar.
| Quadrant | Universal, permanent | FDI, permanent | Universal, primary | FDI, primary |
|---|---|---|---|---|
| Upper right | 1 to 8 | 18 to 11 | A to E | 55 to 51 |
| Upper left | 9 to 16 | 21 to 28 | F to J | 61 to 65 |
| Lower left | 17 to 24 | 38 to 31 | K to O | 75 to 71 |
| Lower right | 25 to 32 | 41 to 48 | P to T | 81 to 85 |
Some quick conversions you'll use all the time:
| Tooth | Universal | FDI |
|---|---|---|
| Upper right central incisor | #8 | 11 |
| Upper right first molar | #3 | 16 |
| Upper left first molar | #14 | 26 |
| Lower left first molar | #19 | 36 |
| Lower right first molar | #30 | 46 |
| Upper right primary second molar | A | 55 |
| Lower right primary second molar | T | 85 |
One trap deserves its own line: in the Universal system, numbers 51 to 82 identify supernumerary permanent teeth, according to the ADA's Universal Tooth Designation System value set. In FDI, 51 to 85 are primary teeth. A referral that says "tooth 51" means different things depending on the system, so always state which one you're using.
How to learn tooth numbering faster
- Learn the pattern, not the list. Universal is one continuous count; FDI is quadrant plus position.
- Anchor on the first molars. #3, #14, #19 and #30 are 16, 26, 36 and 46 in FDI.
- Read FDI as two digits. The WHO oral health surveys manual tells examiners to call tooth 12 "one-two", not "twelve", so the person recording doesn't mix them up.
- Re-chart old cases. Take a completed paper chart and rebuild it in the software.
Dental chart symbols, surfaces and colors
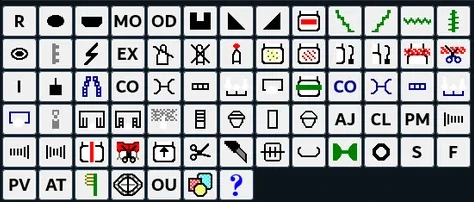
There is no single mandatory charting legend: every dental school, paper form and software has its own. A common convention is red for treatment needed and blue for existing or completed work. It's a convention, not a rule. What matters is that the legend is written down, the whole team uses it, and any dentist can read the chart without asking who filled it in.
Surfaces have standard abbreviations: mesial (M), distal (D), occlusal (O) on posterior teeth or incisal (I) on anterior teeth, buccal (B) or facial (F), and lingual (L). An "MOD" on #19 covers the mesial, occlusal and distal surfaces of the lower left first molar.
A practical legend covers at least:
- decay and restorations, by surface;
- missing teeth and teeth to be extracted;
- root canal treatment;
- crowns, bridges and removable prostheses;
- implants;
- sealants, fractures and lesions to watch.
How do you chart primary and mixed dentition?
A child's chart follows the same logic with 20 primary teeth, lettered A to T in Universal (51 to 85 in FDI). In mixed dentition, primary and permanent teeth are in the mouth at the same time and must appear together: you might chart the permanent first molars (#3, #14, #19, #30) next to the primary second molars (A, J, K, T).
Habits that help with pediatric charting:
- chart each tooth in the right dentition instead of picking a whole adult or child diagram;
- record exfoliation and eruption over the visits, so the transition is visible;
- note the parent or guardian who brings the child and approves treatment.
Initial chart vs. treatment chart: what's the difference?
The initial chart is a snapshot of the first exam: decay, existing restorations, missing teeth, prostheses, implants. It doesn't change afterwards, because it records the starting point.
The treatment chart is the one the team uses every day. It holds the procedures planned for each tooth and, as visits go by, what has been completed.
| Initial chart | Treatment chart | |
|---|---|---|
| Shows | How the patient presented | What is planned and what is done |
| Changes | Never | At every visit |
| Used for | Comparing progress and documenting the baseline | Daily clinical work and estimates |
Keeping them apart avoids the classic paper problem: crossing out what was there to record new work, and then no longer knowing how the patient first presented.
How do you fill in a digital dental chart, step by step?
Charting works best as a routine, always in the same order:
- Open the right patient record and review the medical history before the exam. With a digital medical history, it arrives completed before the visit.
- Confirm the dentition: permanent, primary or mixed.
- Chart existing conditions quadrant by quadrant, always in the same order.
- Mark what needs treatment, tooth by tooth and surface by surface when it matters.
- Pick the procedure for each mark, so it goes into the treatment plan.
- Note what the drawing can't show: mobility, sensitivity or a finding to confirm on a radiograph.
- Review the chart with the patient on screen before moving to the estimate.
- Update the status of each procedure at the end of every visit.
From the dental chart to the estimate and the patient record
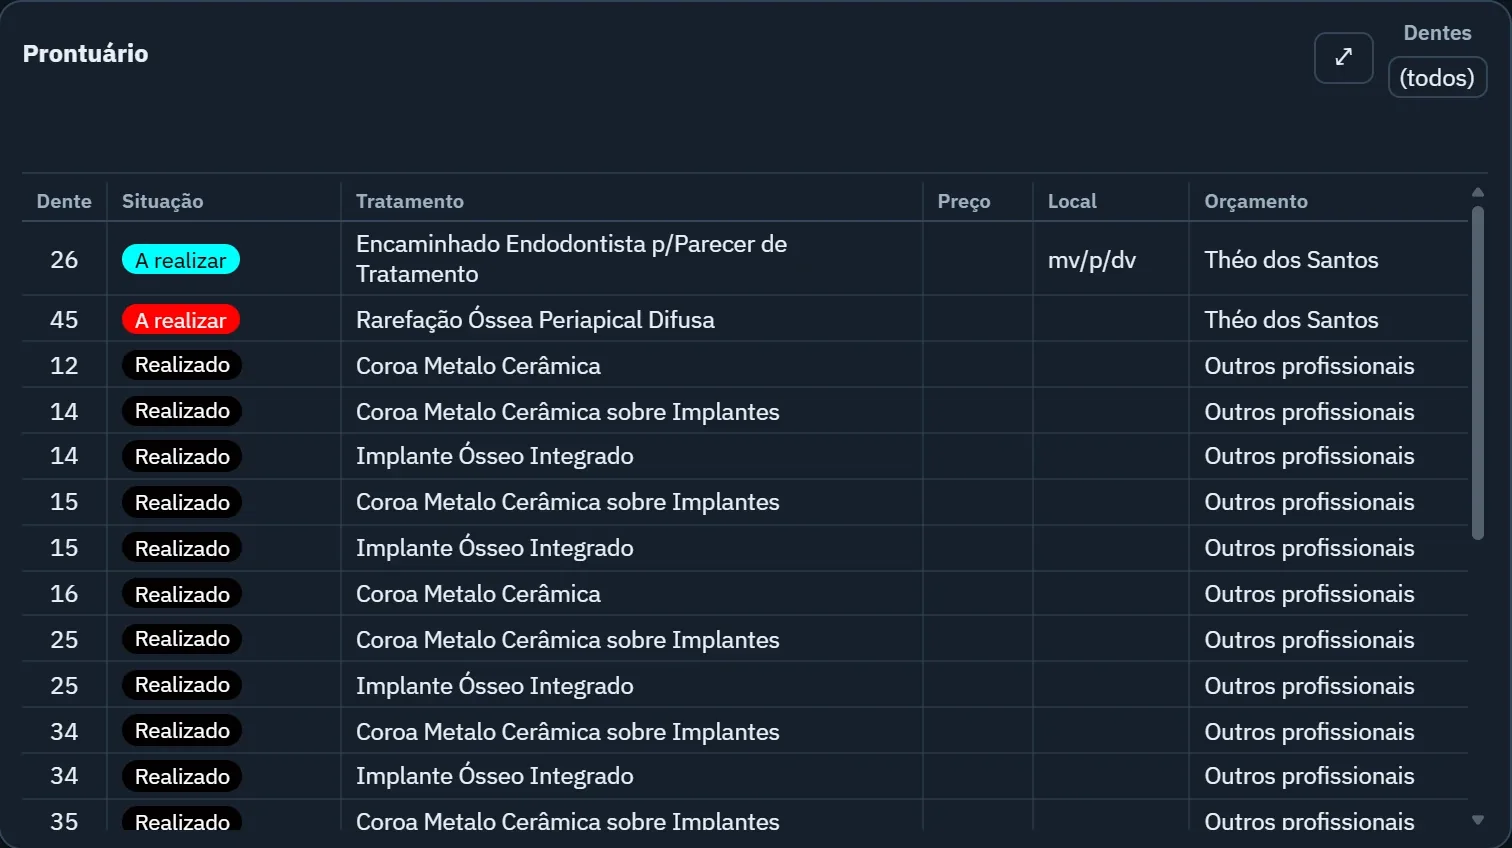
Charting for the treatment estimate. The procedures marked on the teeth become the estimate's line items with no retyping, and the patient sees on the chart exactly what they're approving. That supports the ADA Code of Ethics, which asks dentists to inform patients of the proposed treatment and any reasonable alternatives (section 1.A). The guide to dental treatment plans and estimates shows how to organize the phases.
Charting for the dental record. Once treatment starts, every completed visit changes the status on the matching tooth and goes into the clinical notes of the dental EHR. If another dentist takes over, they open the chart and see in seconds what's done and what's left.
The same ADA Code asks dentists to safeguard the confidentiality of patient records and to maintain them in a way that protects the patient's welfare (section 1.B). Under the HIPAA Privacy Rule, patients also have the right to examine and obtain a copy of their health records and to request corrections, so a clear, current chart matters. The dental patient record checklist lists what else belongs in the file, and periodontal charting follows the same logic of comparing one visit with the next.
Common dental charting mistakes
- Flipping sides. Charting #14 when the problem is #3 because the diagram was read as a mirror.
- Mixing numbering systems. Writing "tooth 51" on a referral without saying Universal or FDI.
- Mixing dentitions. Charting A and #4 in the same spot without knowing which tooth is present.
- Leaving it for later. What isn't charted during the visit tends never to be charted.
- One legend per provider. Agree on a single legend for the team.
- Charting only what goes on the estimate. Existing restorations, missing teeth and work done elsewhere are part of the patient's story.
- Erasing instead of updating. The procedure changes status; the earlier entry stays.
Checklist for choosing dental charting software
When you're choosing or reviewing your practice's software, test the chart with a real case:
- supports the numbering your team and your labs use, plus primary and mixed dentition;
- shows a visible legend next to the symbols;
- keeps existing conditions separate from planned and completed work;
- turns each mark into an estimate line item without retyping;
- opens in the browser on a tablet or phone, chairside;
- shows who charted each procedure and when;
- gives each user an individual login;
- keeps the history available when the patient returns years later.
Digital dental charting in Pro365 GO
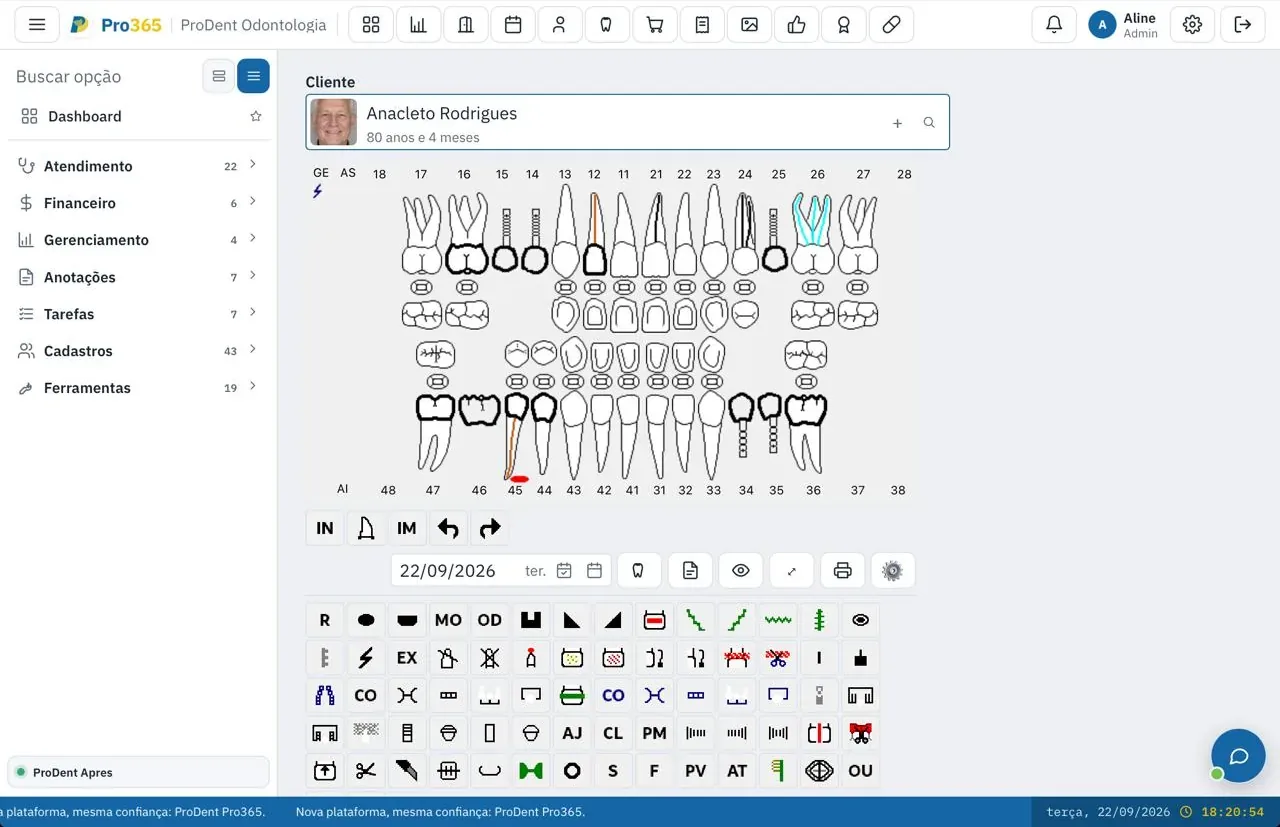
In Pro365 GO, the new ProDent, 100% web, the odontogram lives in the patient record and opens in the browser on a computer, tablet or phone. Procedures are drawn on the tooth with a list beside it that says what each one is, and every treatment is marked as planned or done. What you chart becomes the list of treatments per tooth, with the estimate it came from, and the estimate sits in the same patient's record, with discounts and installment payment plans. Next to the odontogram you'll find the medical history, clinical notes, images, documents and forms such as the periodontal chart, endodontics and plaque index.
See the digital dental chart and book a demo to try it with your own cases.
Written by the HartSystem team, which has developed ProDent dental software since 1993 and works with practices in Brazil, Portugal, the United States, Mozambique and Paraguay.